
Recently, at CodeBy, we migrated our apps and deployments from Digital Ocean to AWS, and with this, we were able to take advantage of the full range of services that Amazon Web Services has. Today, we currently make use of the following:
- Elastic Container Registry
- Code Pipeline
- Elastic Beanstalk
- S3
While we use S3 to serve media such as videos or images and for hosting static websites, the others are used to build our deployment process. Today, I would like to detail how we set it up.
Requirements
- Knowledge in Git and GitHub.
- A Node application (we will use a simple application in this tutorial).
- Basic knowledge in Docker and creating a
Dockerfile.
1. Create a repository on GitHub
In addition to migrating from Digital Ocean to AWS, we also switched from GitLab to GitHub, at least for the apps we need to host. This is because, unfortunately, AWS does not have integration with GitLab by default. To use GitLab, it was necessary to include AWS CodeCommit in this process, but as the goal was to simplify and not complicate, we decided to use GitHub.
On GitHub, create a repository with the required information:
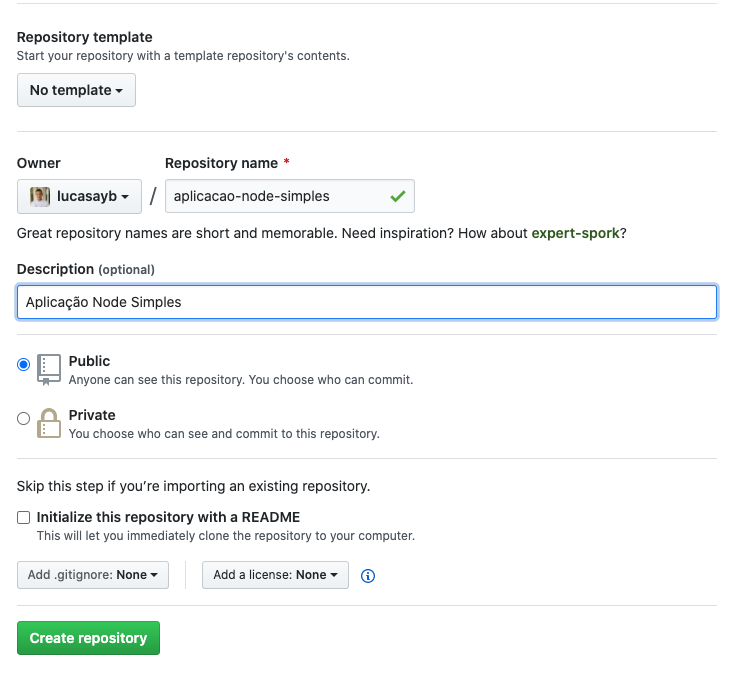
With the repository created, let’s put our simple application in it so that we can use it in our process. To facilitate, I made the repository of this app public on GitHub. You can access it here: https://github.com/lucasayb/aplicacao-node-simples
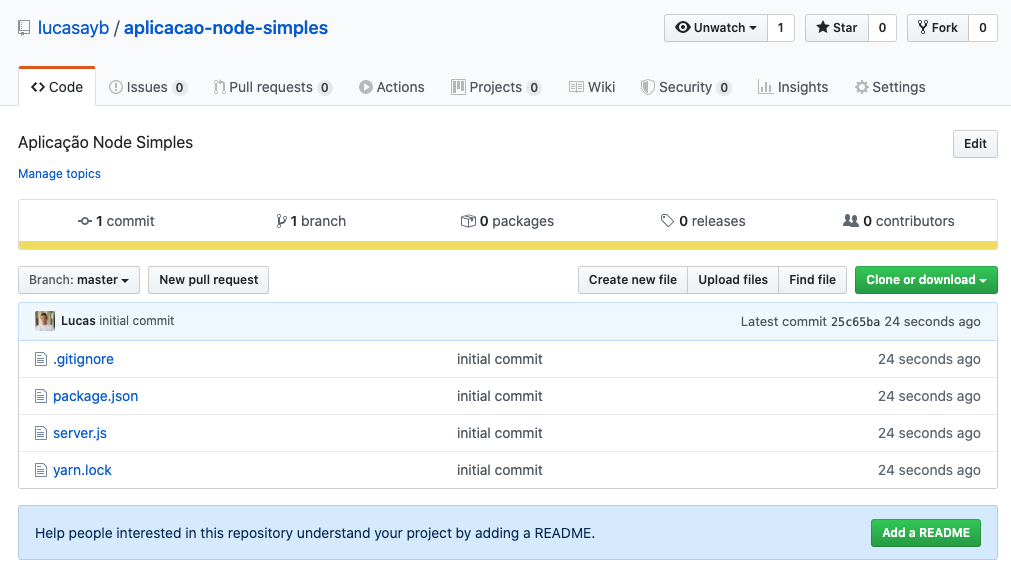
Basically, this application is simple. Its only goal is to display “Hello World” on the screen.
With our application on GitHub, we can proceed to the next step.
2. Create a Docker image of your application
To upload it to AWS, we first need our application to be “Dockerized”, i.e., transformed into a Docker image so that we can upload it to the Elastic Container Registry and retrieve it from Elastic Beanstalk.
What we need is a Dockerfile. It will give the necessary steps for our application to run correctly. Place the following content at the root of your Node application and name it Dockerfile (even without an extension).
FROM node:10.9.0
WORKDIR /var/www/app
COPY package.json yarn.lock ./
RUN yarn
COPY . .
EXPOSE 3000
CMD yarn start
Explaining the steps of our Dockerfile
FROM node:10.9.0: Here we are defining which image will be the base of ourDockerfile. As our app is in Node, we are defining that the base of the image we are creating isnodeversion10.9.0, as it has all the necessary libs to run our current application.WORKDIR /var/www/app: We are defining where our application will be within our Docker container. Keeping in mind that Docker creates containers based on images, within our container created using our image, our application will be available at/var/www/app.COPY package.json yarn.lock ./: We are copying thepackage.jsonandyarn.lockfiles just so we can install our application’s modules before copying it entirely. The purpose of this practice is to make use of Docker’s cache, which executes the respective step only if the files used in it have been changed, and to make an efficient image with a low build time.RUN yarn: here we install our libs defined inpackage.jsonandyarn.lock.COPY . .: with our libs installed, we copy the rest of our application inside the image.EXPOSE 3000: here we are just defining that we want to expose port3000, since it is on this port that our application will be running.EXPOSEactually does not serve to publish the port, but rather to serve as documentation so that the developer can know which port should indeed be published.CMD yarn start: this is the command that will run the container of our application. I defined in thescriptsofpackage.jsonthat thestartcommand will executenode ./server.js.
With this done, we can test the build of our application locally simply by running the following command:
╰─$ docker build -t aplicacao-node-simples .
The return should be something like this:
Sending build context to Docker daemon  2.063MB
Step 1/7 : FROM node:10.9.0
 ---> a860762a13bc
Step 2/7 : WORKDIR /var/www/app
 ---> Using cache
 ---> ae825ecb383e
Step 3/7 : COPY package.json yarn.lock ./
 ---> e012a4029be8
Step 4/7 : RUN yarn
 ---> Running in c60f8b0ec8b6
yarn install v1.9.2
[1/4] Resolving packages...
[2/4] Fetching packages...
(node:6) [DEP0005] DeprecationWarning: Buffer() is deprecated due to security and usability issues. Please use the Buffer.alloc(), Buffer.allocUnsafe(), or Buffer.from() methods instead.
[3/4] Linking dependencies...
[4/4] Building fresh packages...
Done in 1.59s.
Removing intermediate container c60f8b0ec8b6
 ---> b6f3cae0388f
Step 5/7 : COPY . .
 ---> 316a98b3d739
Step 6/7 : EXPOSE 3000
 ---> Running in 541309c8fb87
Removing intermediate container 541309c8fb87
 ---> 567b6c4f8104
Step 7/7 : CMD yarn start
 ---> Running in 5f31defe8178
Removing intermediate container 5f31defe8178
 ---> e0eaf31d3b6e
Successfully built e0eaf31d3b6e
Successfully tagged aplicacao-node-simples:latest
It may take a while, in case you do not have the node:10.9.0 image on your machine.
If everything has gone as planned, you can start a container based on the image created.
╰─$ docker run -e NODE_ENV=production -p 3000:3000 aplicacao-node-simples
We will have the following return and we will see that our application is running:
yarn run v1.9.2
$ node ./server.js
Server running at port 3000
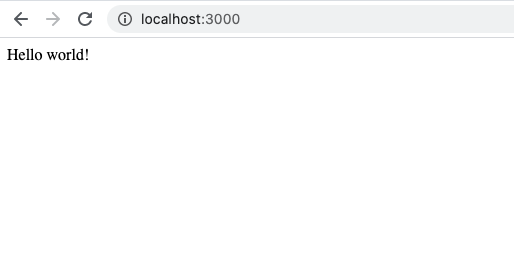
Accessing http://localhost:3000/, we will see our application running on our machine :)
Save and upload it to GitHub.
3. Create a repository in the Elastic Container Registry
Accessing the Elastic Container Registry, create a repository so that we can store our images. We will do this so that we can retrieve it in Elastic Beanstalk:
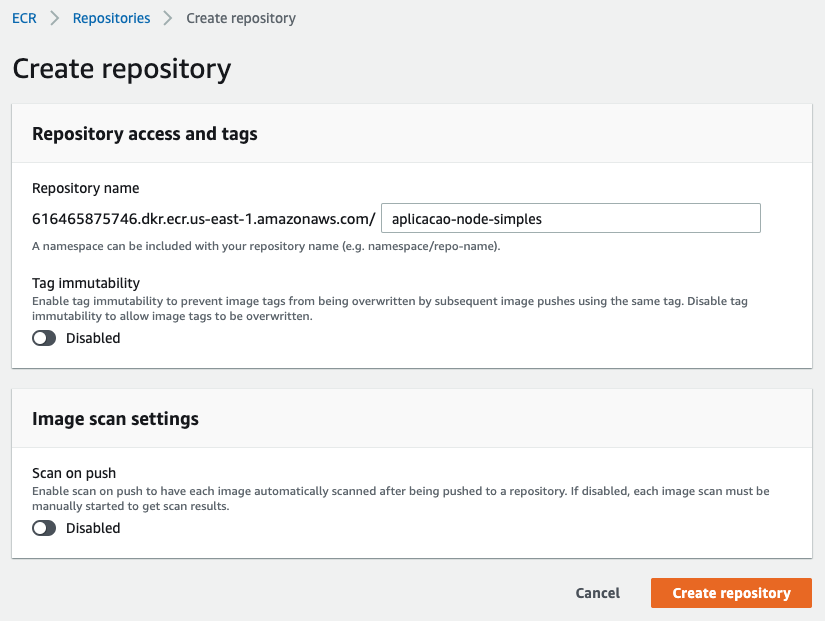
Just fill in the repository name and click on Create repository.
Then we will have our image created:

Keep the URI information so we can use it later.
4. Create an application and environment in Elastic Beanstalk
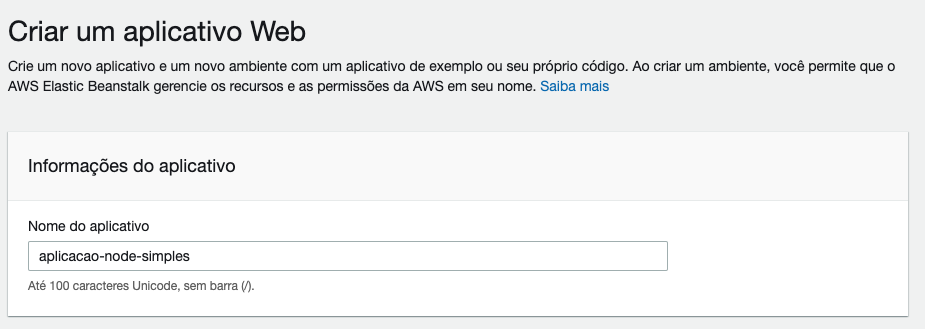
Access Elastic Beanstalk and create a new application.
Enter the Application name:
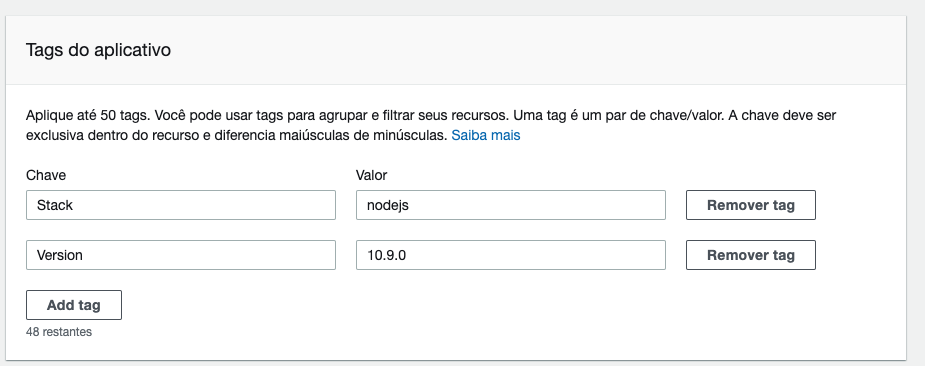
Insert the application tags (optional):
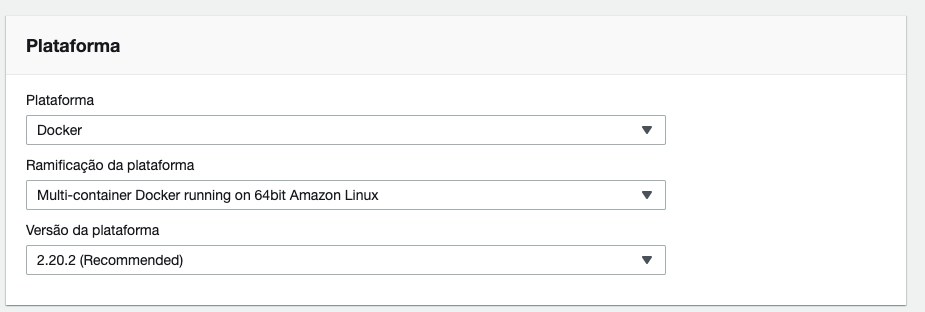
Select the Platform we will use. In this case, Docker. And for the Platform branch, I usually select Multi-container Docker. This way, we can add new containers within the same environment:
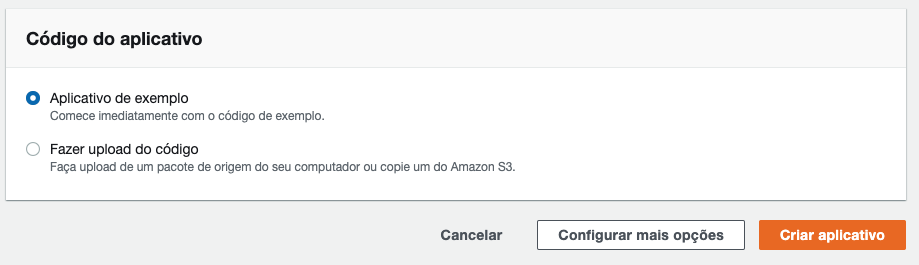
Then, in Application code, we can leave Sample application selected, as this will be the default application that will start with our application. Instead of clicking directly on Create application, click on Configure more options to customize how our environment will be created. Remember, this step is important because some modifications cannot be made when our environment is already running:
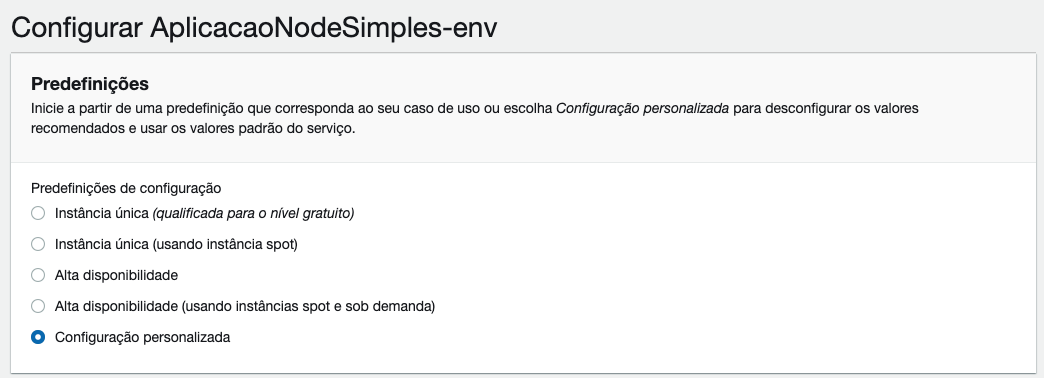
In Configuration presets, select Custom configuration. This will allow us to configure the Load balancer if we want and set up SSL for our domain (This is something I will leave for a future tutorial):
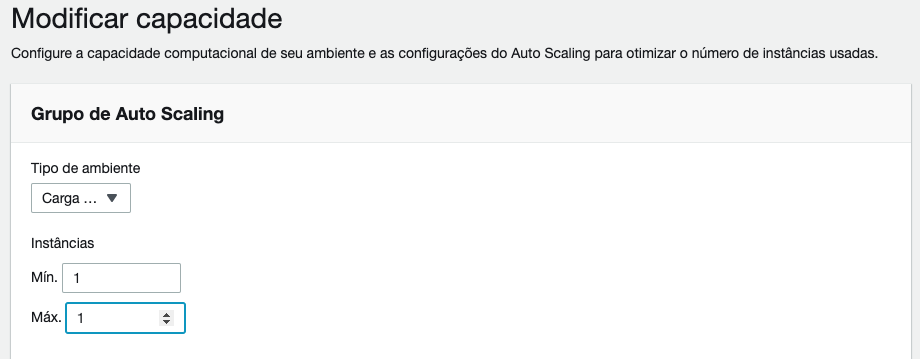
In the Capacity card, click on Edit. On this new screen, just edit the Max instances to 1 and click Save:
As everything is configured as we wish, click on Create application. A new screen will open and it will take a few minutes until our application is running:
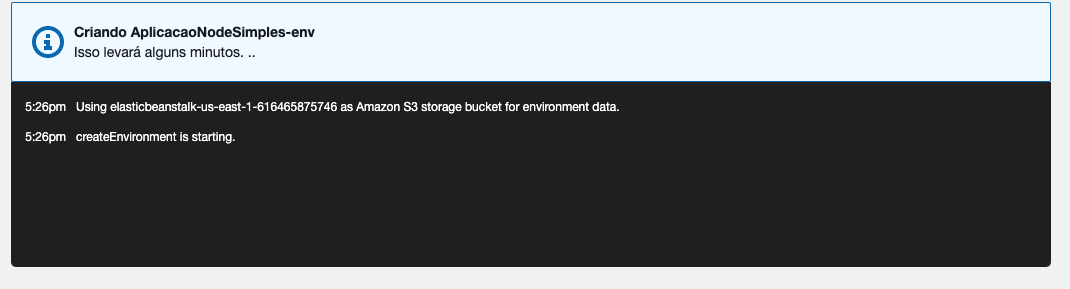
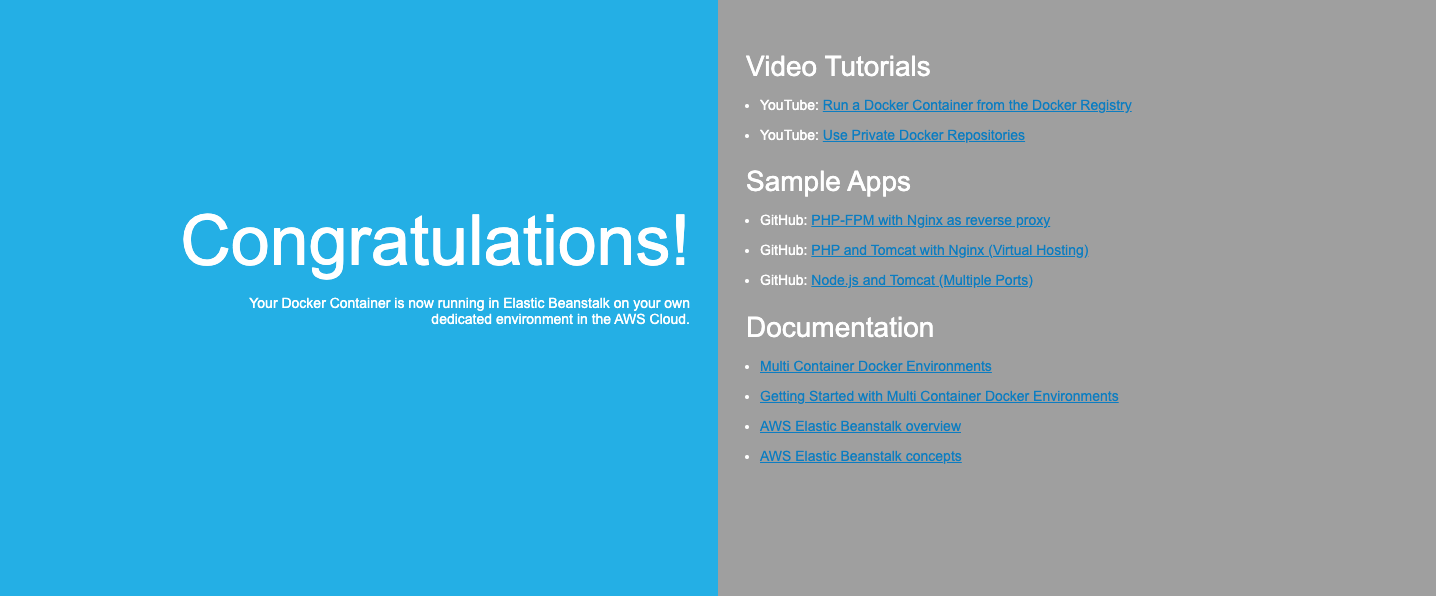
Wait these minutes (something around 10 minutes) and see the application running on the AWS URL provided, below the environment name:
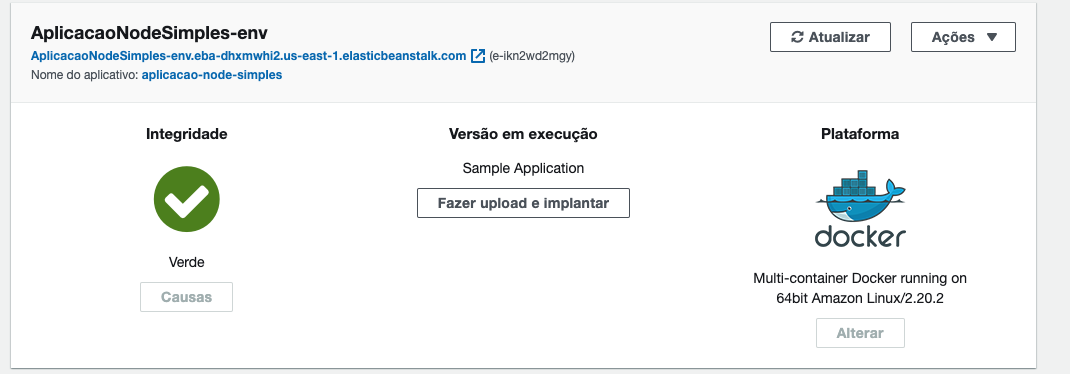
Done! Your environment has been created! You will probably have the following result:
5. Creating the buildspec
The Buildspec is nothing more than the file responsible for knowing how to proceed in this build. At the root of our project, we will create a file called buildspec.yml. In it, we will have the rules of how CodeBuild will proceed to compile our project:
version: 0.2
phases:
  pre_build:
    commands:
      - echo Logging in to Amazon ECR...
      - $(aws ecr get-login --no-include-email --region $AWS_DEFAULT_REGION)
  build:
    commands:
      - echo Build started on `date`
      - echo Building the Docker image...
      - docker build -t $IMAGE_REPO_NAME:$IMAGE_TAG .
      - docker tag $IMAGE_REPO_NAME:$IMAGE_TAG $AWS_ACCOUNT_ID.dkr.ecr.$AWS_DEFAULT_REGION.amazonaws.com/$IMAGE_REPO_NAME:$IMAGE_TAG
  post_build:
    commands:
      - echo Build completed on `date`
      - echo Pushing the Docker image...
      - docker push $AWS_ACCOUNT_ID.dkr.ecr.$AWS_DEFAULT_REGION.amazonaws.com/$IMAGE_REPO_NAME:$IMAGE_TAG
artifacts:
  files:
    - Dockerrun.aws.json
To facilitate, let’s “dissect” the content of the phases section of this file:
pre_build:
    commands:
      - echo Logging in to Amazon ECR...
      - $(aws ecr get-login --no-include-email --region $AWS_DEFAULT_REGION)
In this section, we are connecting to the Elastic Container Registry.
build:
    commands:
      - echo Build started on `date`
      - echo Building the

 Docker image...
      - docker build -t $IMAGE_REPO_NAME:$IMAGE_TAG .
      - docker tag $IMAGE_REPO_NAME:$IMAGE_TAG $AWS_ACCOUNT_ID.dkr.ecr.$AWS_DEFAULT_REGION.amazonaws.com/$IMAGE_REPO_NAME:$IMAGE_TAG
Here in build, we are executing the docker build so that our image is created based on our previously created Dockerfile and then adding some tags so we can identify our image more easily.
post_build:
    commands:
      - echo Build completed on `date`
      - echo Pushing the Docker image...
      - docker push $AWS_ACCOUNT_ID.dkr.ecr.$AWS_DEFAULT_REGION.amazonaws.com/$IMAGE_REPO_NAME:$IMAGE_TAG
In post_build, we simply perform the docker push, that is, we send our image to a Docker repository, in this case, the Elastic Container Registry.
Notice that in each of these steps we have some variables. These are the variables that will be inserted into our pipeline.
artifacts:
  files:
    - Dockerrun.aws.json
In this last step, we generate an Artifact called Dockerrun.aws.json. Basically, it is simply what we will send to Elastic Beanstalk. In the next step, I will explain how to create this file.
Save and upload it to GitHub.
6. Creating the Dockerrun.aws.json
The Dockerrun.aws.json file is responsible for guiding Elastic Beanstalk on how it should proceed and what it will run. For this, we must insert the necessary rules in it. Create the file with this exact name at the root of your project, with the following content:
{
    "AWSEBDockerrunVersion": 2,
    "volumes": [],
    "containerDefinitions": [
      {
        "name": "app",
        "image": "616465875746.dkr.ecr.us-east-1.amazonaws.com/aplicacao-node-simples:latest",
        "environment": [],
        "essential": true,
        "memory": 256,
        "links": [],
        "mountPoints": [
          {
            "sourceVolume": "awseb-logs-app",
            "containerPath": "/app/log"
          }
        ],
        "portMappings": [
          {
            "containerPort": 3000,
            "hostPort": 80
          }
        ]
      }
    ]
  }
In image, we will place the URI generated by the Elastic Container Registry with the latest tag, defined in the CodePipeline step. In portMappings, we will simply insert in containerPort, the port on which our application will run, in this case, 3000.
Save, and upload it to GitHub.
7. Create a pipeline in CodePipeline
Now, to get our application up and running, we will create a new pipeline. A pipeline is nothing more than a series of steps that automate the build and deploy process of our app, known as CD, or Continuous Deployment.
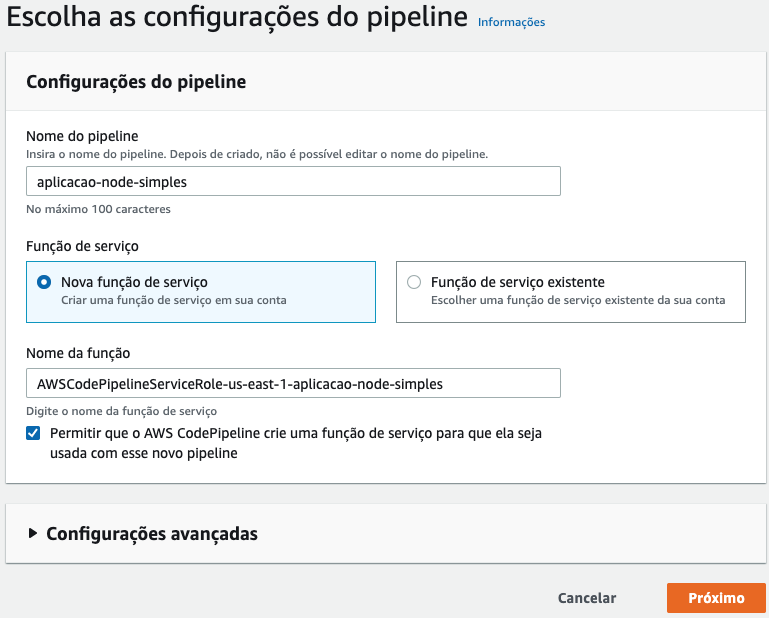
Enter the name of your pipeline. So that our pipeline can access the necessary services for the deploy, it will automatically create a service function. We will need to change this service function later. Then, click Next:
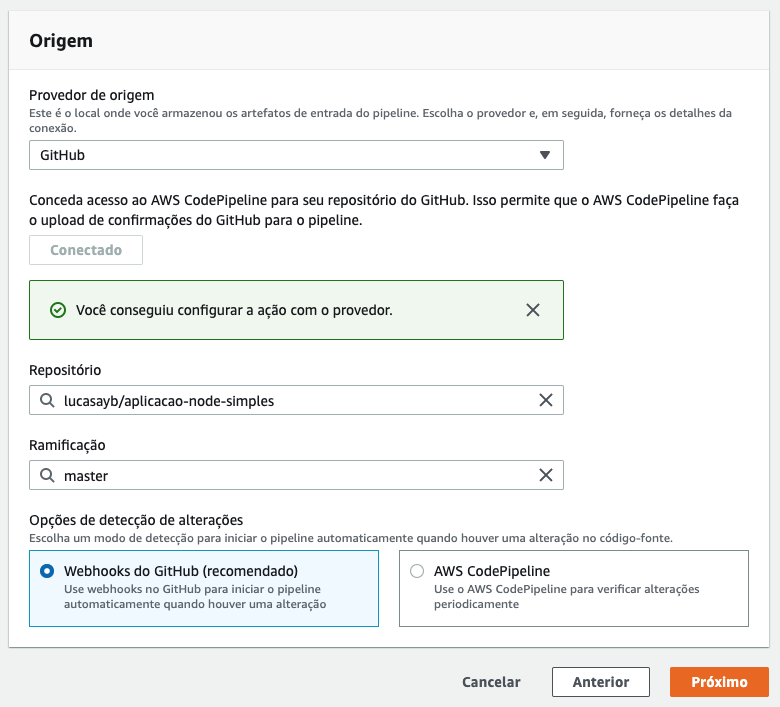
Here we will have the options of source provider, that is, where our code will be extracted to carry out this process. As we created a repository on GitHub earlier, select GitHub in Source provider. Click on Connect to GitHub, and as soon as you log in to GitHub, select the desired repository and branch that will trigger this pipeline. Basically, every time a push is triggered on our branch, in my case master, the pipeline process will start. Then, click Next:
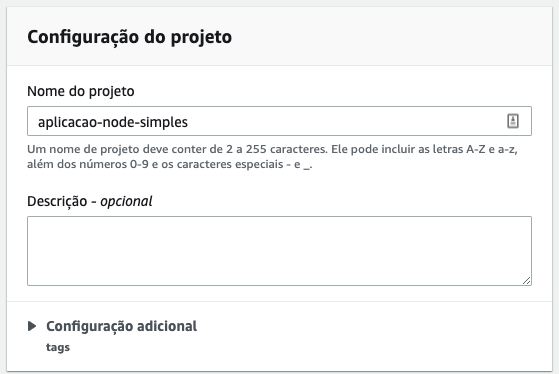
In the compilation stage, select AWS CodeBuild as the build provider. Then, click Create project. A new tab will open. In this tab, in the Project configuration section, enter the Project name:
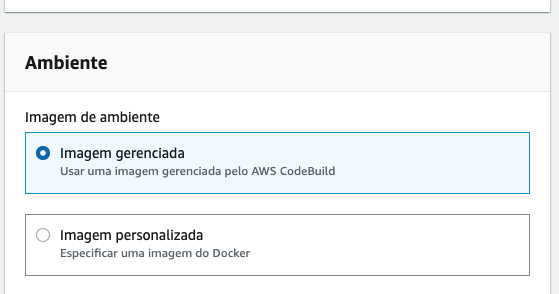
In the Environment section, keep Managed image selected for the Environment image:
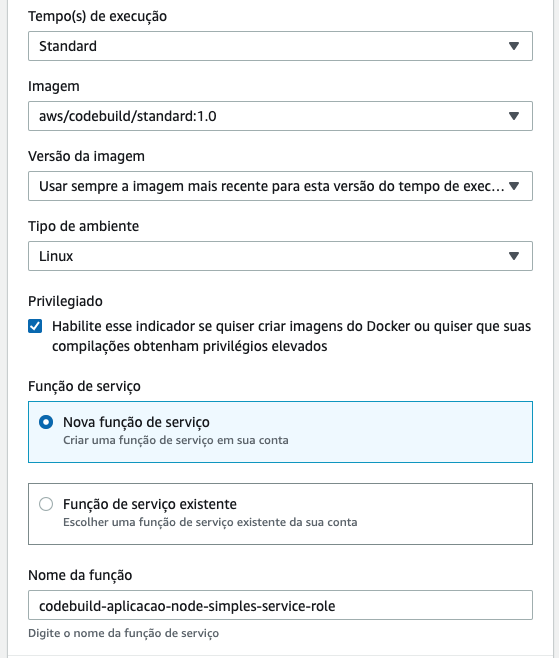
Put the Operating system as Ubuntu. Runtime(s) we will select Standard. Image we will select aws/codebuild/standard:1.0. Image version, we will select Always use the latest image for this runtime version and in Environment type we will keep Linux selected. Enable the Privileged option as our pipeline will generate an image. Notice also that this build will create a new service function. Save it too as we will need to modify it later:
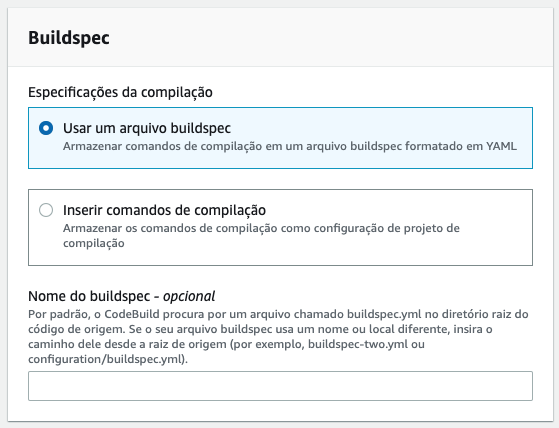
In the Buildspec section, we will keep the option of Use a buildspec file selected. This is the file we created earlier.
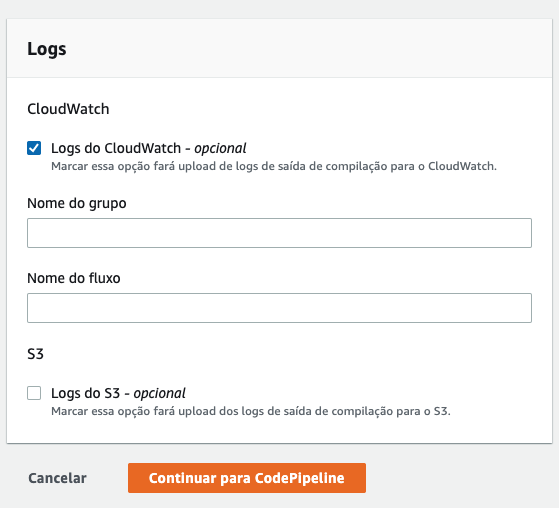
In the Logs section, we will keep the selected configurations and to finish, we will click Continue to CodePipeline.
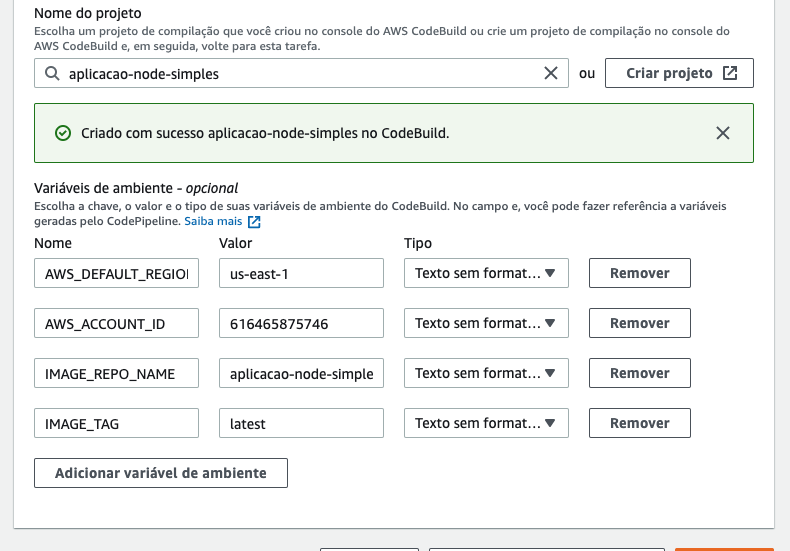
Back in the CodePipeline build step, in the Environment variables section, insert the following variables:
AWS_DEFAULT_REGION: your AWS region. In my case,us-east-1AWS_ACCOUNT_ID: your account id. It is present in your URL generated by the Elastic Container RegistryIMAGE_REPO_NAME: the name of your repository created in the Elastic Container Registry. In my case, aplicacao-node-simples.IMAGE_TAG: the tag of your image. We can leavelatestas the standard.
You should have something like the following:
Click Next and proceed.
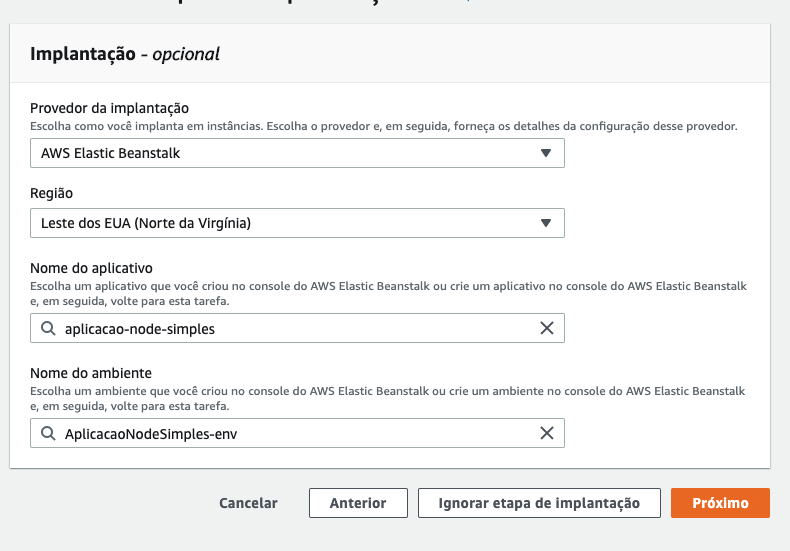
This is the Deployment step. It’s where we will send our application information to Elastic Beanstalk. In Deployment provider, select AWS Elastic Beanstalk, Application name select the application created in EBS and in Environment name, select the environment created in EBS, along with our application:
Review your information, and if everything is correct, click Create pipeline.
Immediately after, your pipeline will be executed. Probably, the Build step will fail.
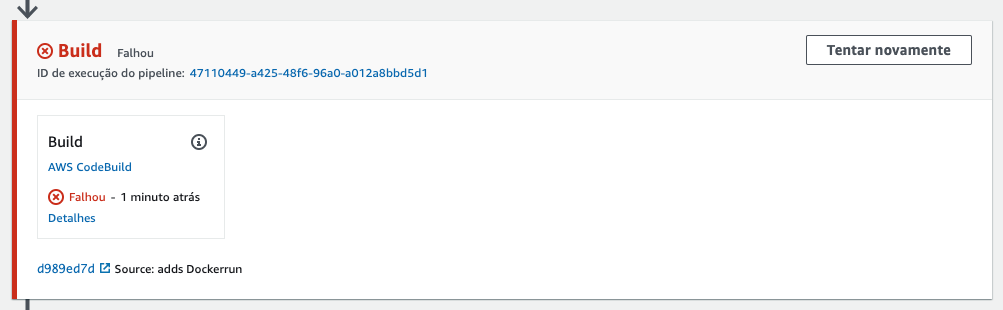
Viewing the details, we will see the following error:
An error occurred (AccessDeniedException) when calling the GetAuthorizationToken operation: User: arn:aws:sts::616465875746:assumed-role/codebuild-aplicacao-node-simples-service-role/AWSCodeBuild-cec2e87f-49bc-41cb-b95f-29930a6b74fc is not authorized to perform: ecr:GetAuthorizationToken on resource: *
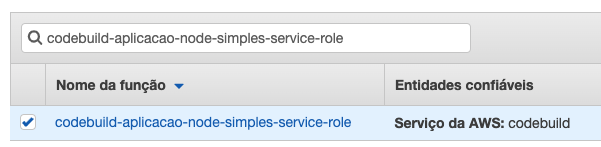
It means that CodeBuild does not have authorization to upload our image to the Elastic Container Registry. To fix this, let’s change the service functions, created earlier by CodePipeline and CodeBuild, so they can have the necessary permissions in the process. Access AWS IAM. In the sidebar, click on Roles and search for the first function created in the CodeBuild process, in my case, codebuild-aplicacao-node-simples-service-role:
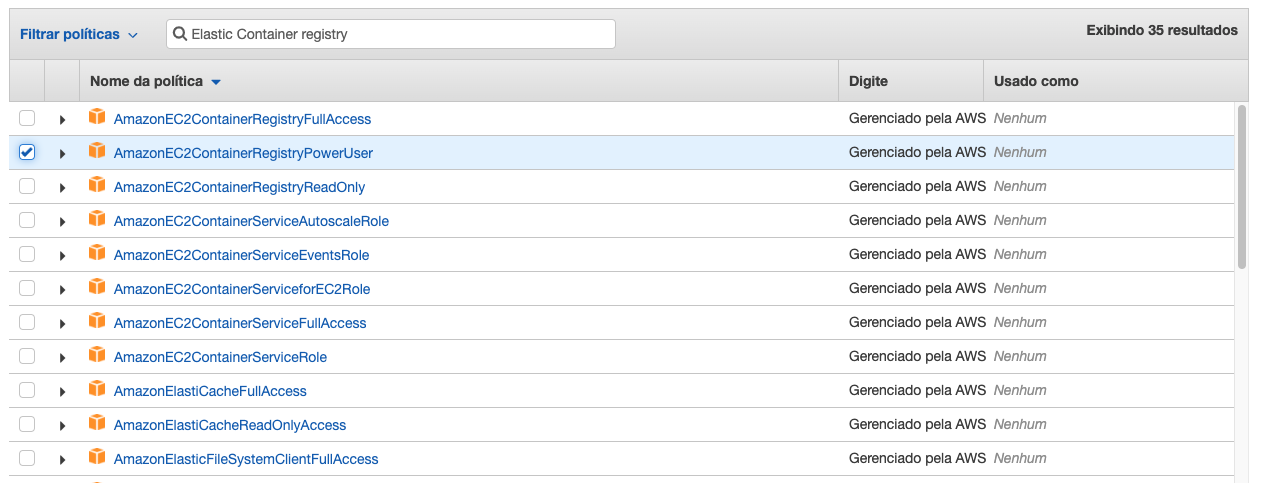
Click on the role, and then, click on Attach policies:

In the next screen, search for Elastic Container Registry and select the policy AmazonEC2ContainerRegistryPowerUser. Basically, this policy is responsible for writing and reading images in the Elastic Container Registry, but it will not be able to delete any images. Click on Attach policy. Do the same for the function created by CodePipeline, in my case, AWSCodePipelineServiceRole-us-east-1-aplicacao-node-simples:
Also change the function aws-elasticbeanstalk-ec2-role so that Elastic Beanstalk can have access to the Elastic Container Registry. This should be done only once.
Once this is done, return to CodePipeline, select your created pipeline and click on Release change. Basically, it will execute the pipeline based on the last commit in your repository.
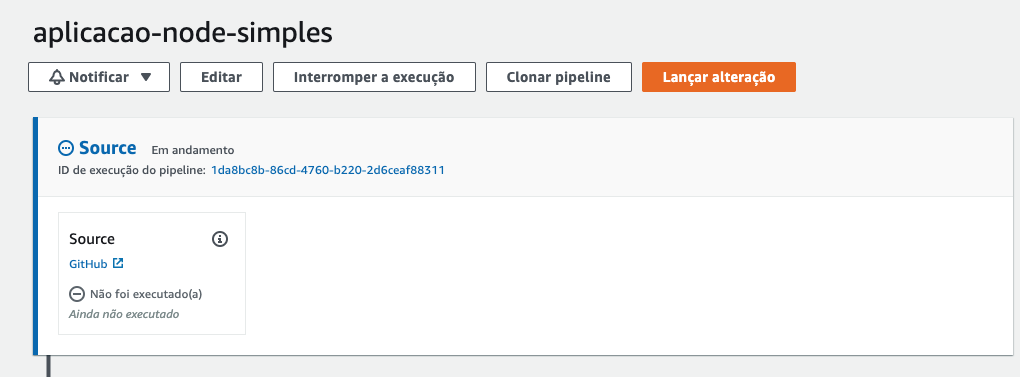
If everything has been done correctly, your pipeline should now run without any problems!
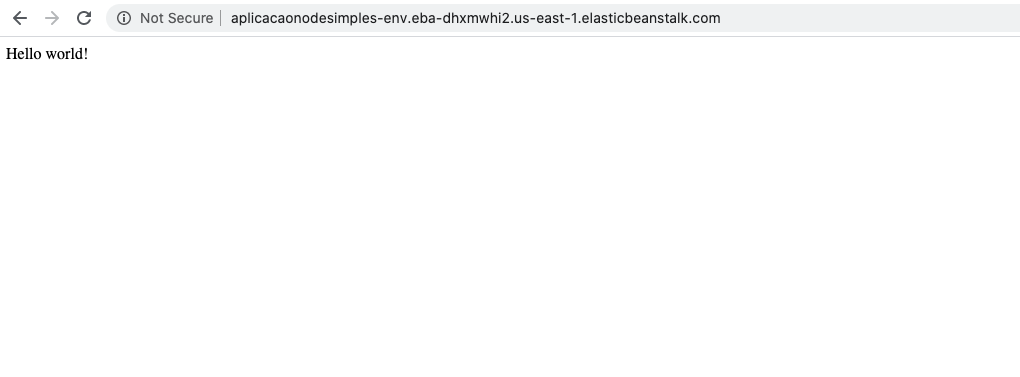
Access your application and voilà!
It’s important to note that this entire process is using AWS resources. This incurs costs. If your intention is just for learning, don’t forget to delete the resources used, otherwise unwanted charges will be issued!
Comments