


Decap CMS (formerly Netlify CMS) is used mainly to manage the content of your Static Site that uses markdown. You don’t actually need to have a markdown website to use this CMS, but you may lose a lot of it’s potential if you don’t.
Before anything, I’m assuming that you have the following stack:
- Hugo extended ~>0.113.0
- Github as the cloud-based Git repository manager
- Your site deployed into Netlify
- A little bit of experience with Git
1. Create a config.yml file into the static/admin folder.
In this file, you should place the following content:
backend:
  name: github
  repo: lucasayb/the-ssg-central
  branch: main
  site_domain: thessgcentral.com

media_folder: "static/uploads" # Adjust based on your media storage location
public_folder: "/uploads" # URL path for accessing media

collections:
  - name: "posts" # This is the name used in the URL
    label: "Post" # This is the singular name of the content type for the UI
    folder: "content/post" # The folder where your posts markdown files will be saved
    create: true # Allows users to create new documents in this collection
    slug: "{{year}}-{{month}}-{{day}}-{{slug}}" # Filename template for new posts
    fields: # List of fields for the front matter
      - { label: "Title", name: "title", widget: "string" }
      - { label: "Description", name: "description", widget: "text" }
      - { label: "Date", name: "date", widget: "datetime" }
      - { label: "Image", name: "image", widget: "image", required: false }
      - { label: "Hidden", name: "hidden", widget: "boolean", default: false }
      - { label: "Comments", name: "comments", widget: "boolean", default: true }
      - { label: "Draft", name: "draft", widget: "boolean", default: false }
      - { label: "Weight", name: "weight", widget: "number" }
      - { label: "Body", name: "body", widget: "markdown" }
Let’s see what it’s happening in this code:
backend:
  name: github
  repo: lucasayb/the-ssg-central
  branch: main
  site_domain: thessgcentral.com
We need to define where the content of the website is coming from.
- The
namemust begithubif you, as me, are using Github - The
repomust be the user or organization and the name of your repository - The
branchis themainbecause generally is where we store the content that reflects exactly what we have in production, but it can be any other branch that you prefer. Keep in mind that there are a few themes that still creates the branch asmaster. This is not a good practice, but still happens. Change it in the way it suits your case. - The
site_domainshould be the main domain of your website
That’s way we define that we handling with Git and
media_folder: "static/uploads" # Adjust based on your media storage location
public_folder: "/uploads" # URL path for accessing media
With Decap CMS, we can upload media. the media_folder is where the Decap CMS is going to send these media. The public_folder is the URL that is used to access these media. If you change any of those folders, you should change both for the same name. For example:
media_folder: "static/cool_images" # Adjust based on your media storage location
public_folder: "/cool_images" # URL path for accessing media
And then, there are the collections:
collections:
  - name: "posts" # This is the name used in the URL
    label: "Post" # This is the singular name of the content type for the UI
    folder: "content/post" # The folder where your posts markdown files will be saved
    create: true # Allows users to create new documents in this collection
    slug: "{{year}}-{{month}}-{{day}}-{{slug}}" # Filename template for new posts
    fields: # List of fields for the front matter
      - { label: "Title", name: "title", widget: "string" }
      - { label: "Description", name: "description", widget: "text" }
      - { label: "Date", name: "date", widget: "datetime" }
      - { label: "Image", name: "image", widget: "image", required: false }
      - { label: "Hidden", name: "hidden", widget: "boolean", default: false }
      - { label: "Comments", name: "comments", widget: "boolean", default: true }
      - { label: "Draft", name: "draft", widget: "boolean", default: false }
      - { label: "Weight", name: "weight", widget: "number" }
      - { label: "Body", name: "body", widget: "markdown" }
This is where things get trick. A collection is basically the folder where you store your posts. Here you can have the collections based on your needs. But I’m going to exemplify using the posts collection
- name: "posts" # This is the name used in the URL
The name posts is the URL that is going to be displayed into the CMS.
label: "Post" # This is the singular name of the content type for the UI
In the UI, every element that refers to a post, is going to have the label that you define in here.
folder: "content/post" # The folder where your posts markdown files will be saved
By default, a post in Hugo is stored in the content/posts folder. In my case, I’ll use the content/post because it is the way my theme handles it.
create: true # Allows users to create new documents in this collection
Keep this option as true. This tells the CMS that a user can create a post using the CMS, otherwise you would be able only to edit or view the posts.
slug: "{{year}}-{{month}}-{{day}}-{{slug}}" # Filename template for new posts
As Hugo is based on files, the filename has a great importante into how your data is stored and how they are viewed in the public perspective. In this line, we are telling to Decap CMS how we want it to create the file name of each of our posts. But I’ll recommend for you to keep in the way above, because this way works fine.
    fields: # List of fields for the front matter
      - { label: "Title", name: "title", widget: "string" }
      - { label: "Description", name: "description", widget: "text" }
      - { label: "Date", name: "date", widget: "datetime" }
      - { label: "Image", name: "image", widget: "image", required: false }
      - { label: "Hidden", name: "hidden", widget: "boolean", default: false }
      - { label: "Comments", name: "comments", widget: "boolean", default: true }
      - { label: "Draft", name: "draft", widget: "boolean", default: true }
      - { label: "Weight", name: "weight", widget: "number" }
      - { label: "Body", name: "body", widget: "markdown" }
Here we have all the fields that comes by default with Hugo whenever we create a new post with hugo new content command. Feel free to change the way you prefer. For example if you don’t want to show the Draft field and wants it to always to come marked as true, you can change the draft field to the following:
- { label: "Draft", name: "draft", widget: "hidden", default: false }
This will not show the field in the CMS and every time that you create a new post through it, the post will never be marked as draft. This is handy when you are a solo blogger and don’t want to worry to much with editorial workflow.
2. Creating the index.html file into the static/admin folder.
This step if pretty straightforward. All you need to do is to create the file as mentioned and place the following content:
<!doctype html>
<html>
<head>
  <meta charset="utf-8" />
  <meta name="viewport" content="width=device-width, initial-scale=1.0" />
  <meta name="robots" content="noindex" />
  <title>Content Manager</title>
</head>
<body>
  <!-- Include the script that builds the page and powers Decap CMS -->
  <script src="https://unpkg.com/decap-cms@^3.0.0/dist/decap-cms.js"></script>
</body>
</html>
That’s basically it. Now, there are possible customizations that can be done into this file, like creating custom elements into the dashboard and modifying the previews, but I’m not going to cover them in this post.
3. Deployment of these files
After all that, you can just commit both of this files and push it to your repository. You can either use the Ui for that or the command line:
$ git add .
$ git commit -m 'adds files to install Decap CMS'
$ git push -u origin main
After a few minutes or the time needed for your site to be deployed, if you access /admin of your site, you should be able to see the following screen:

However, if you click in Login with GitHub, you will get the following error:

The great is that this error tells exactly what you got do.
- Go to the Settings of your Github Account and scroll down to the Developer Settings.

- While in the Developer Settings page, select the OAuth Apps and click in New OAuth App.

- Give a name to your app (it can be your site name), put URL of your site and in the Authorization Callback URL, put the following:
https://api.netlify.com/auth/done
- Generate a new app secret and store it safely with the clientId of your app. We will use both later.
- Now you need to access your Netlify panel and go to Sites. Select your site and go to Site Configuration.

- Go to Access & security tab. Scroll down to the OAuth section and click in Install Provider in the Authentication providers box.

- Fill both of the fields with the data that we generated on Github
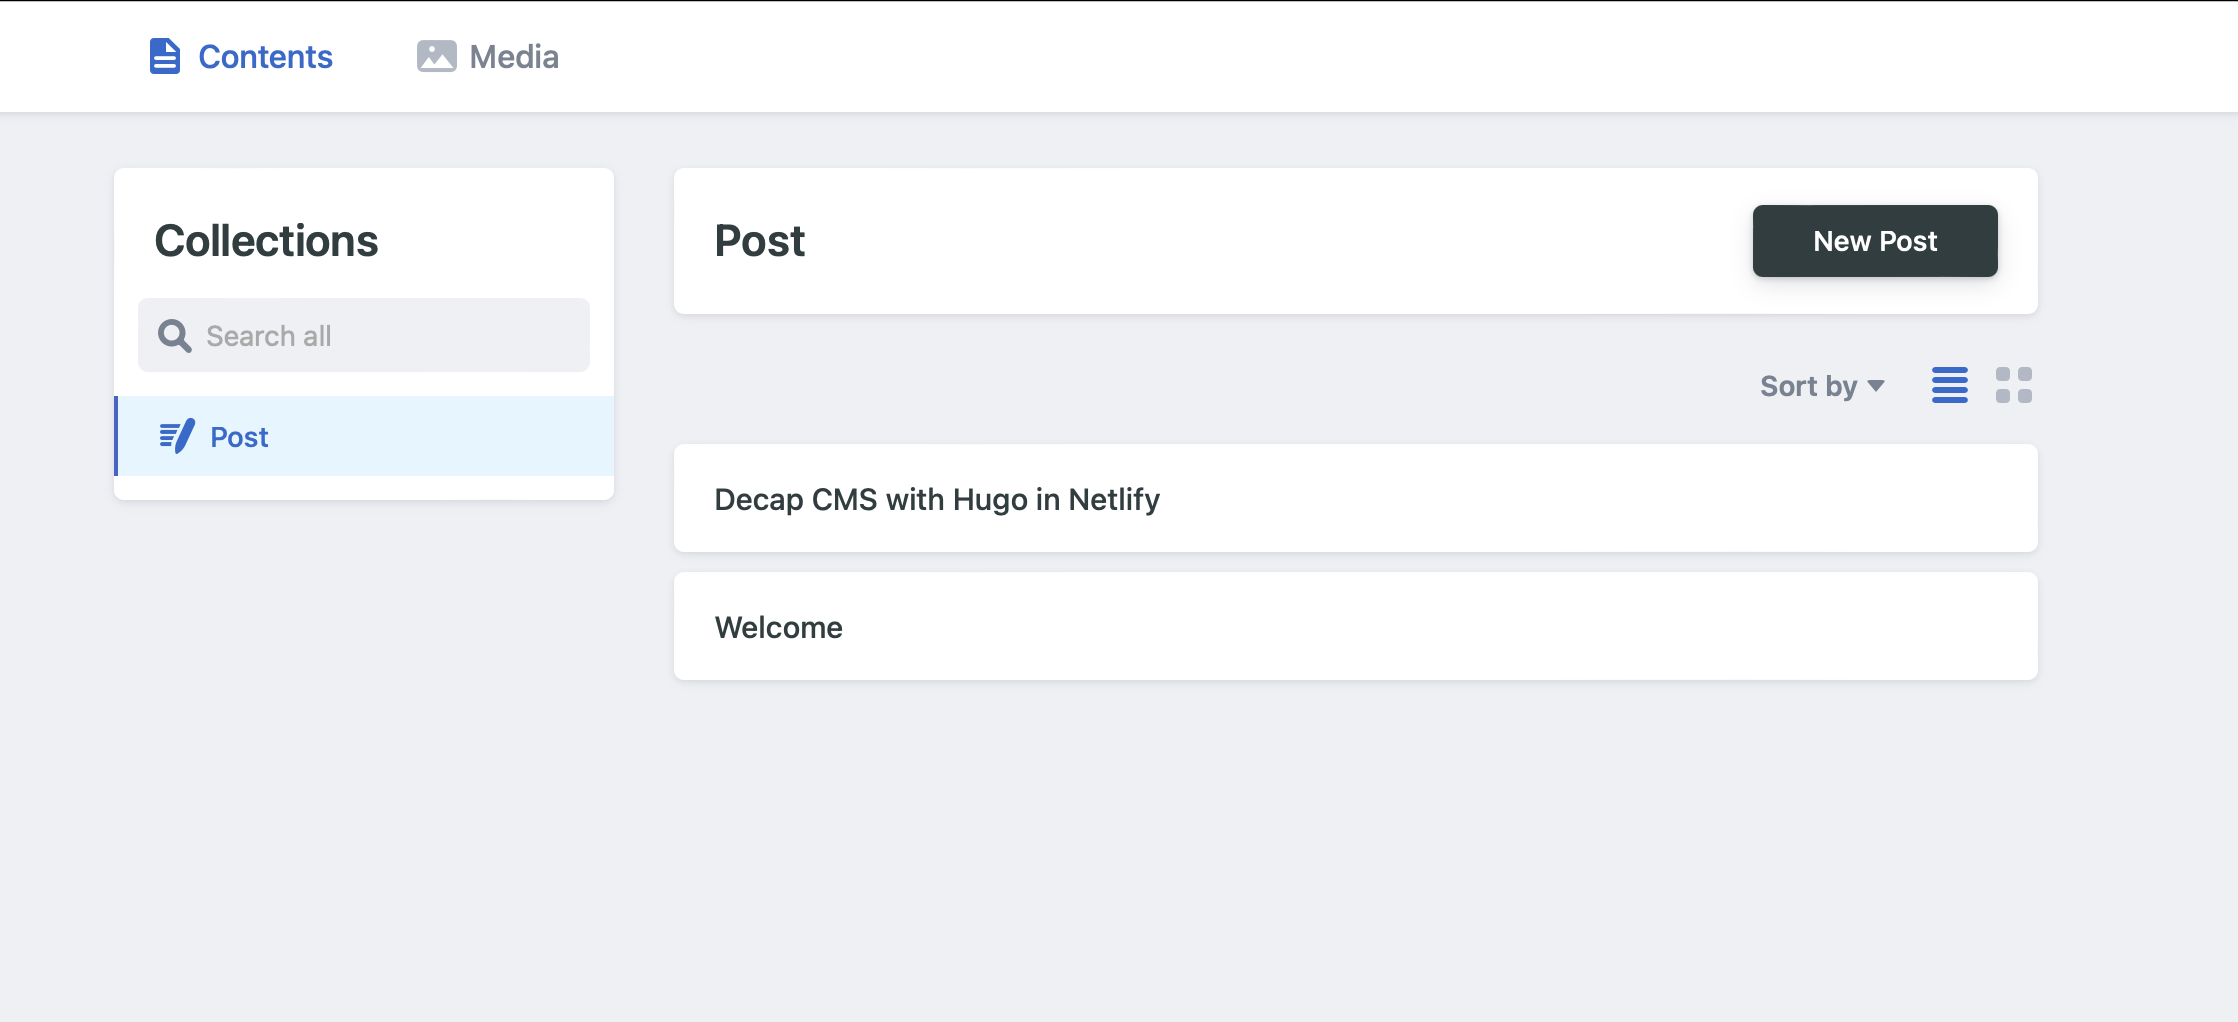
Now, if you try to log in again, you will be able to go to the main page of the Decap CMS and see all of your posts, if you already have any:
That’s it. I may have a series specifically for the customization of the Decap CMS and a few tips.
Let me know your comments.
Comments